AI Generated Music Video: How It Works and Tools Used
Learn what an AI generated music video is, how the four-stage pipeline builds one, and which models and checks make it work.
Music creators are projected to have 24% of their revenue at risk by 2028, according to the CISAC economic-impact study summarized by GEMA. That projection puts AI-generated music videos in a different light: they aren't just visual experiments, but production choices with consequences for artists, editors, and audiences.
Making one responsibly takes more than a compelling prompt. You need a song-based production plan, clips you can repair independently, measurable synchronization checks, and a clear account of what people and models contributed.
Table of Contents
- What an AI Generated Music Video Actually Is
- The Four Stages From Song to Finished Video
- Models That Turn Prompts and Images Into Motion
- Checking Lip Sync and Beat Alignment
- Common Problems and How to Fix Them
- Disclosing AI Involvement Without Losing Trust
- Test Your First Clip Before Committing to a Full Song
What an AI Generated Music Video Actually Is
An AI-generated music video is a music video whose visuals, soundtrack, or both are produced with generative models rather than entirely recorded or filmed. Say you've recorded a song about leaving home: you might generate train-window scenery, animate a portrait of the singer, and assemble those shots around your existing recording.
In a US-focused 2026 survey of 1,003 video creators, musicians, marketers, and music supervisors, 19% used generative AI to find or create music for video, while 32.7% had used AI-generated music as the final audio in published content, according to Berklee. Those measures concern music within video workflows, not the share of music videos generated entirely by AI.
Three ways a project can use AI
- Fully synthetic: Both the song and moving images come from generative models, with a person directing and selecting the results.
- Hybrid: A human-recorded track accompanies generated scenes, such as the train-window sequence.
- AI-assisted: You film the performance, then use AI for editing or effects. This isn't necessarily an AI-generated video in the narrower sense.
Think of the song as the score and the prompts as a shot list that a model interprets. You're still responsible for deciding what belongs on screen.
Text-to-video turns written instructions into a clip. Image-to-video animates a supplied still. A segment is a bounded part of the song, a shot prompt directs its imagery, and the final edit combines the selected material.
Before choosing tools, name your project's parts: recording, vocals, lyrics, reference images, generated shots, and editing. Mark which are human-made and which you'll generate. That simple inventory tells you which version you're making.
The Four Stages From Song to Finished Video
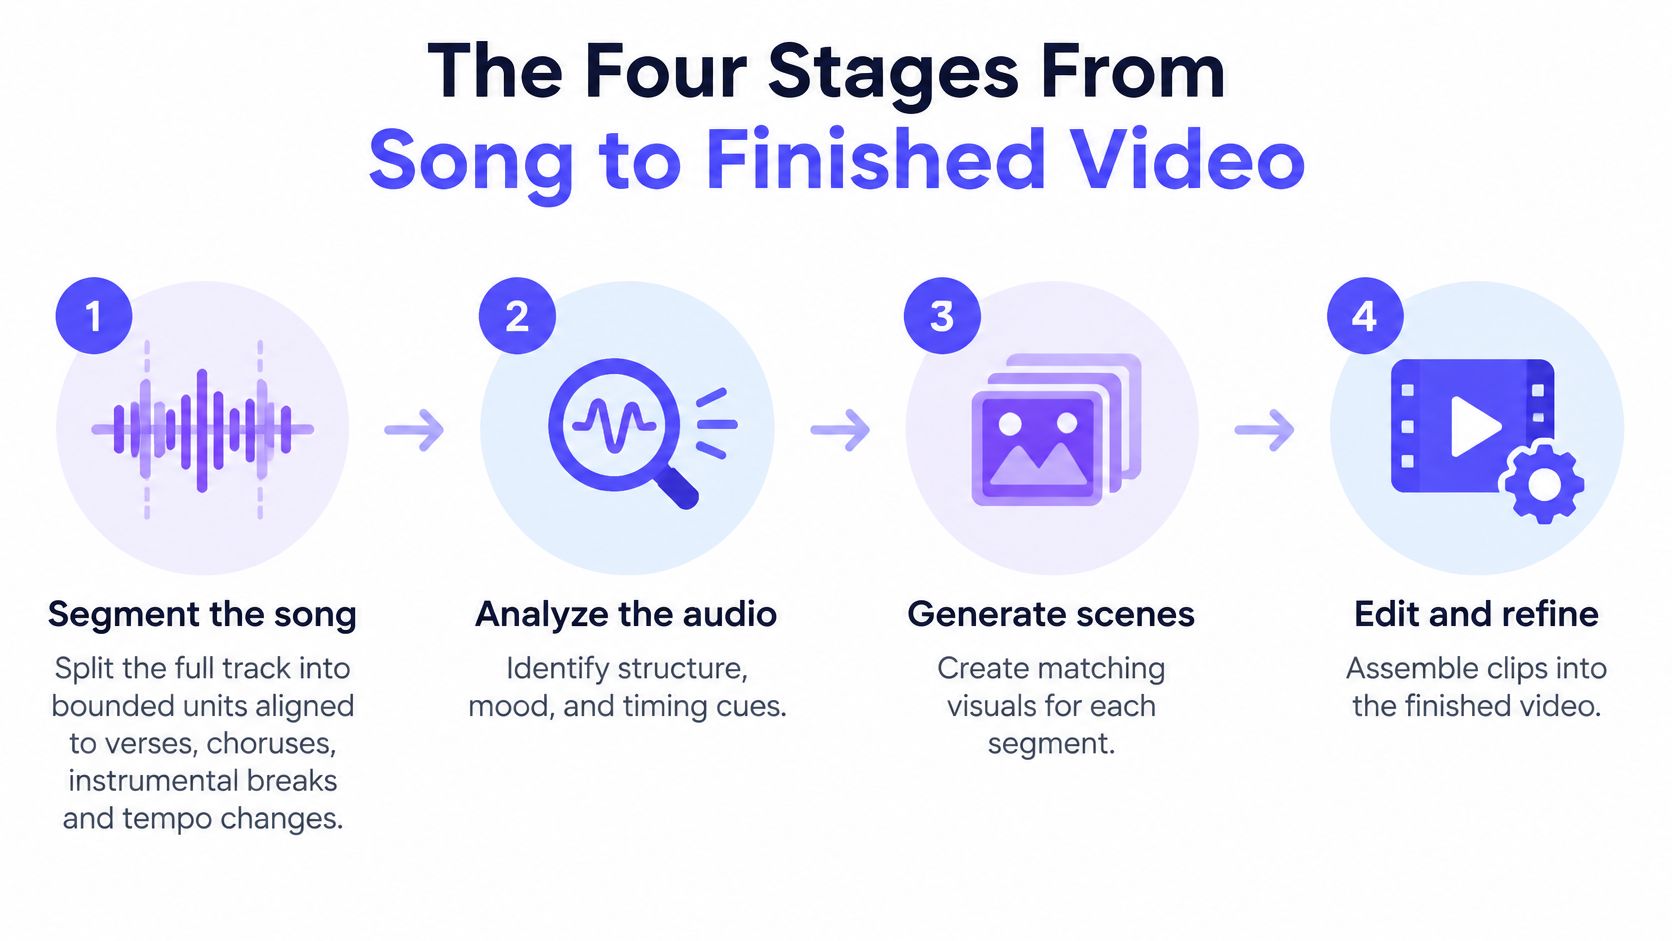
A song-length production is easier to control when you treat it as a collection of manageable jobs. The published From Sound to Sight pipeline follows song segmentation, audio analysis and script generation, text-to-video generation, and final assembly.
The workflow below separates creative decisions from rendering tasks.
Build around musical structure
Segment the song. Mark verses, choruses, music-only breaks, and tempo changes, then divide them into bounded generation units. A musical section can contain several shots, so don't confuse a chorus label with a requirement to generate one continuous clip.
Analyze the audio and write the visual script. Identify tempo, energy, vocal passages, and changes in mood, then assign a shot prompt to each segment. For the leaving-home song, a quiet verse might use a still platform scene, while the chorus introduces forward movement.
Generate the clips. Use text-to-video for independently described scenes or image-to-video where a supplied visual reference matters. Review each result against its assigned purpose before accepting it into the edit.
Assemble the final edit. Place approved clips in deterministic order against the master track. Standardize frame rate, resolution, aspect ratio, and final loudness so mixed outputs behave like one production.
Pipeline stages, inputs and outputs
| Stage | Input | Output |
|---|---|---|
| 1. Segment the song | Full track with timestamps | Bounded segments with timecodes and labels |
| 2. Analyze audio and write the script | Segments, tempo, vocal cues | One shot prompt per segment |
| 3. Generate the clips | Shot prompts, optional reference stills | One short clip per segment, with seed and model version stored |
| 4. Assemble the final edit | Clips and the original track | One render at constant frame rate with normalized loudness |
Make every segment recoverable
Bounded clips help limit temporal drift, where objects, identities, or actions change as a generated sequence continues. They also let you replace a weak shot without discarding a successful sequence.
Store a production manifest containing each segment's timecode, lyric or music-only label, tempo, energy, shot prompt, seed, model version, and output location. Keep reference-image identifiers alongside that record when applicable. A seed helps document a run, but it isn't a guarantee of identical results across model updates.
Production rule: Treat the segment manifest as your editable project, not just a log of completed downloads.
For a practical companion to planning and assembly, AIMVG's music video production walkthrough provides a useful workflow reference. Developers implementing the rendering layer can use the AI video generation API guide to connect those segment records to generation tasks.
Models That Turn Prompts and Images Into Motion
Text-to-video gives you room to invent; image-to-video gives you a visual starting point. That distinction matters more than choosing one model for an entire song.
With text-to-video, you describe the subject, setting, action, camera, and lighting. It's useful for scenery, symbolic imagery, and establishing shots where an exact recurring face isn't essential. Independent generations can interpret the same description differently, so repeated wording alone shouldn't be your identity-control strategy.
Image-to-video starts with a still you supply. It can anchor clothing, composition, and facial appearance, but it doesn't lock every later frame. A difficult movement or camera angle can still produce unwanted changes.
Match the input to the shot
For a recurring singer, prepare a clean reference image with an unobstructed face and readable clothing. Synchronicity Labs on image-to-video is a useful companion when deciding how to turn a still into a directed moving shot.
The following families provide starting candidates, not a quality ranking. Treat each role as something to test against your own material, and verify the current endpoint's supported inputs before submitting.
Model families by input mode and music-video role
| Model | Input mode | Typical role in a music video | Watch for |
|---|---|---|---|
| Kling 3.0 Standard | Text to video or image to video | General-purpose shots and an initial candidate | Check clip length limits before planning segments |
| Veo 3.1 Fast | Text to video | Iteration on mood and establishing shots | Verify current resolution and audio options |
| Seedance 2.0 | Image to video | Artist or character shots anchored to a still | Needs a clean reference image |
| Wan 2.6 | Text to video | Instrumental and abstract segments | Inspect motion continuity before accepting |
| PixVerse V5.6 | Text to video | Stylized or experimental segments | Check that stylization preserves required details |
Separate appearance from performance
A visually consistent face isn't automatically a singing performance. Lip-sync and audio-driven models address mouth movement against supplied audio; ordinary image animation shouldn't be assumed to do that job.
A practical combination is text-to-video for atmospheric passages, image-to-video for recurring artist shots, and an audio-driven step for visible singing. You can also avoid performance close-ups entirely if the concept works better as a narrative or visualizer.
Keep prompts focused on observable action. The text-to-video prompting guide can help translate an abstract mood into camera direction and subject movement. Clip limits, resolution options, and generation time change between releases, so choose the model by segment requirements, not brand familiarity.
Checking Lip Sync and Beat Alignment
A beautiful face can still sing the wrong syllable. Visual fidelity and audiovisual synchronization are separate acceptance criteria: the lip-sync evaluation paper examines 615 generated clips and uses measures including Landmark Distance (LMD) and Lip Sync Error–Confidence (LSE-C) to assess mouth motion and audio correspondence.
LMD measures mouth-region landmark error against expected motion. LSE-C estimates confidence that lip movement matches the speech track. Neither should be treated as a complete artistic score, and a speech-oriented measure needs careful interpretation when applied to sustained singing, backing vocals, or expressive mouth shapes.
Run the checks in order
- Extract beat and onset timestamps. Use an audio-analysis tool to identify rhythmic positions and note attacks. Mark which events require a cut or movement accent, rather than forcing every beat into a transition.
- Mark vocal segments. Identify where a visible performer should be singing. Use the correct vocal excerpt and preserve its offset relative to the master track.
- Score and inspect each clip. Apply mouth-related measures to visible singing, then assess timing and musical fit. Watch at normal speed as well as frame by frame.
- Regenerate only failed segments. Record whether the failure concerns timing, articulation, image quality, or musical interpretation before requesting a replacement.
Sync checks and where each applies
| Check | What It Measures | Apply To |
|---|---|---|
| Mouth landmark error (LMD) | Mouth-region landmark distance from the expected motion | Vocal segments |
| Lip sync confidence (LSE-C) | Whether lip motion matches the speech track | Vocal segments |
| Beat or onset alignment | Whether cuts and motion accents land on musical events | Every segment boundary |
| Rhythm and mood match | Whether motion pace and tone follow the track | Instrumental segments |
Define gates before the final render
There's no supplied universal pass score for every singer, style, or model. Calibrate your gates using clips you've reviewed and accepted, then keep those settings consistent within the project.
- Mouth-motion gate: Reject visible singing with unacceptable articulation error or weak synchronization confidence.
- Timing gate: Reject unintended misses at designated musical events.
- Motion consistency gate: Reject motion that contradicts the intended pace, mood, or subject.
- Perceptual gate: Reject distracting face distortion even when a numerical score looks acceptable.
Suppose the singer's mouth follows the correct words but the whole performance begins late. Correct the clip offset before commissioning a new performance. If the timing is right but the mouth articulates different sounds, an edit alone won't repair it.
A deliberate cut before the beat can work. An accidental cut after the intended accent is a production error.
Save the scores and review notes with the segment record. That gives you a reason for each rejection and makes replacement selection less arbitrary.
Common Problems and How to Fix Them
When a character changes coat or face between shots, first inspect the source material and generation instructions. Don't try to hide every identity mismatch with a transition. Decide whether the problem belongs to the reference, the generated performance, or the assembly.
Diagnose before regenerating
Common production problems, causes and fixes
| Symptom | Likely Cause | Fix |
|---|---|---|
| Characters change between shots | Prompt drift across independent segments | Use image-to-video with one fixed reference still per character |
| Mouth out of sync with vocals | Segment timing does not match the vocal stem | Regenerate the segment with corrected timecodes and recheck lip-sync confidence |
| Cuts land off the beat | Boundaries set by eye, not by detected onsets | Re-cut on onset timestamps during assembly |
| Flicker or morphing in long clips | Clip longer than the model holds stable | Use shorter segments and join them in the edit |
| Colour or frame rate differs between clips | Mixed output settings | Normalize frame rate, resolution and aspect ratio at assembly; match colour separately |
| Uneven loudness between cuts | No loudness normalization on the final mix | Normalize loudness across the full edit |
| One clip failed after a crash | Whole-project rerun used instead of segment recovery | Regenerate only that segment from its stored seed and metadata |
Separate edit repairs from design changes
Assembly repairs include moving a cut, correcting an offset, matching colour, or fixing an export setting. Try these before paying for new imagery. Cropping can solve a framing mismatch, but preview the result carefully so you don't remove a singer's hands or cut through important action.
Generation repairs require a new clip because the actual content is wrong. Examples include a morphing face, incorrect articulation, or a camera move that obscures the subject. Change the specific failed instruction rather than rewriting the whole prompt.
Concept repairs require a broader rethink. If every shot depends on complex choreography that your chosen approach can't preserve, simplify the performance or switch to a narrative treatment.
For reference-led work, the screenshot-to-video guide offers a useful starting point for turning a prepared image into motion. Inspect the still first: baked-in blur, obstructed faces, and confusing anatomy are poor foundations for animation.
Keep the song as a continuous master track unless your arrangement intentionally changes. Accidental clip audio can introduce loudness jumps even when the original recording is consistent. After a crash, recover completed files and resume from the failed segment rather than treating the whole production as lost.
Disclosing AI Involvement Without Losing Trust
AI-assisted and AI-generated describe different contributions. A human performance with AI cleanup isn't the same as a synthetic vocalist, and a blanket label can obscure that distinction rather than clarify it.
Keep a record of the recording and editing contributions while you work.
In a 2025 experiment with 120 participants, identical audio received higher likability, engagement, emotional-impact, and quality ratings when attributed to a human pianist, and 79% reported noticing differences, according to the audiovisual authorship study. That's a reason to write disclosure carefully, not a justification for concealing material contributions.
Label the contribution, not just the project
- Music and lyrics: State separately whether composition or words were generated.
- Vocals: Identify a synthetic singing voice rather than implying a recorded human performance.
- Visuals: Distinguish generated scenes from filmed footage.
- Editing: Describe AI cleanup or effects without suggesting the underlying performance was synthetic.
For a hybrid project, a description could state that the artist wrote and performed the song, while the visuals were AI-generated and human-edited. For a synthetic singer, make that fact prominent enough that viewers won't mistake the performance for a recording of the depicted person.
Disclosure principle: Be specific about what was generated and equally specific about what people created.
Use the title when synthetic authorship is central to the premise, the description for contribution details, and credits or an end card for the fuller production record. Follow applicable platform requirements rather than treating placement as purely a marketing choice.
For an additional viewing reference, the embedded video is available below.
Test truthful wording against watch time, completion, comments, and audience trust, market by market. Keep the underlying facts unchanged across tests. A label that improves clicks but leaves viewers confused about the vocalist isn't a successful disclosure.
Test Your First Clip Before Committing to a Full Song
Start with a passage that can expose your hardest production problem. A chorus with visible singing and a clear rhythmic accent is more informative than atmospheric scenery if the finished video depends on performance close-ups.
Run a small acceptance test
Choose a representative excerpt. For example, you might test a ten-to-fifteen-second chorus passage, provided the selected endpoint supports that duration. Include both a vocal phrase and a musical event you intend to emphasize.
Choose the input approach. We recommend Kling 3.0 Standard as the first video model to start with, using text-to-video or image-to-video. Choose a reference-led shot when recognizability is essential.
Write one focused shot prompt. Specify subject, action, framing, camera movement, and lighting. Avoid combining a location change, costume change, and complex performance into the same trial.
Generate and track the task. Our image and video jobs return a task you can poll, or you can set a webhook to notify your app when the result is ready. In a web tool, use its progress view instead of submitting duplicate jobs while waiting.
Apply the acceptance checks. Inspect visible singing, designated beat accents, identity, and distracting artifacts. Record the failure category rather than accepting a clip because it looks impressive.
Scale only after acceptance. Carry the successful prompt structure and reference choices into your segment plan. Preserve the test result as a comparison for later shots.
Use the interface to inspect the available controls before committing a generation request.
Check cost before scaling
Review pricing and failure policies before submitting. Our reply to a video request states the most it can cost before generation starts; a completed video is billed at its final price, and failed generations aren't billed.
If the test passes both the relevant lip-sync check and your designated beat checks, proceed to the full segment plan. If it fails, correct timing errors first, then change the model or reference image where the generated content is the problem. Retest before multiplying that choice across the song.
UberLLM offers access to video, image, music, and speech models through a unified API, so you can build the separate stages of a music-video pipeline without maintaining a different integration for each provider. Visit UberLLM to compare model options and run a representative clip before committing to a full-song production.