Remove Background API: How It Works and What to Check
Learn how a remove background API returns transparent PNG masks, handles hard edges, and fits production image and video workflows.

A pretty preview can be the least useful output a remove background API returns. If the file behind it has no real alpha channel, or if its edges are hard clipped, you can't composite it cleanly on a new background, reuse it across templates, or trust it in a batch. I'd take a lower resolution file with a correct matte over a sharp looking image that faked transparency with a painted checkerboard.
That's the test to apply throughout. The product isn't the thumbnail. It's the pixel level transparency you can inspect, measure, and reuse without manual cleanup.
Table of Contents
- Remove Background API Outputs at a Glance
- How to Send an Image and Receive a Transparent Result
- Sync, Async and Webhook Patterns Compared
- Measuring Mask Quality With an Acceptance Test
- Hard Cases Where Masks Fail and How to Fix Them
- Video Frames and Temporal Consistency
- Validating Uploads, Keys and Error Handling
- Confirm Your Pick Before You Ship
Remove Background API Outputs at a Glance
A remove background API takes an uploaded image, segments the subject from the background, and returns a transparent image, an alpha matte, or a mask. That one sentence hides the decision that determines most downstream work. You aren't just buying subject detection. You're buying a specific file contract.
Five outputs, five different promises
| Output | What it contains | Best for | Main risk |
|---|---|---|---|
| RGBA PNG cutout | Subject pixels plus an alpha channel | Compositing on new backgrounds and catalog images | Halos if alpha is hard-thresholded |
| 8-bit alpha matte | Partial transparency for every pixel | Hair, fur, glass and motion blur | Hard to preview without compositing |
| Binary mask | Foreground as 1, background as 0 | Region checks and batch cropping | Loses soft edges entirely |
| Transparent WebP | Alpha channel in WebP | Web delivery with smaller files | Lossy mode can smear fine edges |
| Flattened JPEG on white | No transparency | Marketplace listings that require a white background | Background is baked in and cannot be reused |
An RGBA PNG cutout is the safest default when someone else will composite the result. You keep the subject's color pixels and a separate transparency value for each pixel, so a layout system can place the same asset on white, brand color, or a photograph. The risk shows up at the boundary. If the provider thresholded a soft edge into fully opaque or fully transparent, you'll see a light or dark fringe as soon as the new background contrasts with the old one.
An 8-bit alpha matte gives you the most control and the least convenient preview. Because every pixel can carry partial coverage, it's the right representation for hair strands, fur, glass rims, lace, and motion blur. You need your own compositing step to judge it, which is exactly why teams skip evaluation and miss problems. Judge it composited, not as a gray image.
A binary mask answers a narrower question. It's useful for cropping, region counts, or checking whether a subject is present, provided the provider documents the threshold used to create it. It cannot support soft edges by definition. If your pipeline turns a binary mask back into a product image, wispy detail is already gone.
Transparent WebP is a delivery choice, not a quality upgrade. It can reduce file size for web use, but lossy settings can blur thin jewelry, text on packaging, and hair. Keep a lossless master and derive WebP from it, so you can change compression later without calling the API again.
A flattened JPEG on white is fine only when the destination permanently requires white and you keep the original elsewhere. Once it's flattened, you can't recover transparency, change the background, or reconstruct a soft shadow. The global AI background-removal market was valued at USD 1.42 billion in 2024, according to Growth Market Reports, which is a good reminder that plenty of vendors will sell you a result, but not necessarily a reusable one.
Start here: Choose the output your pipeline needs before comparing providers, because a provider that wins on a JPEG preview may fail completely as a matte source.
How to Send an Image and Receive a Transparent Result
The workflow is short enough to wire up in an afternoon, provided you verify the file you receive instead of trusting the preview. Start with the output you selected, then follow this sequence.
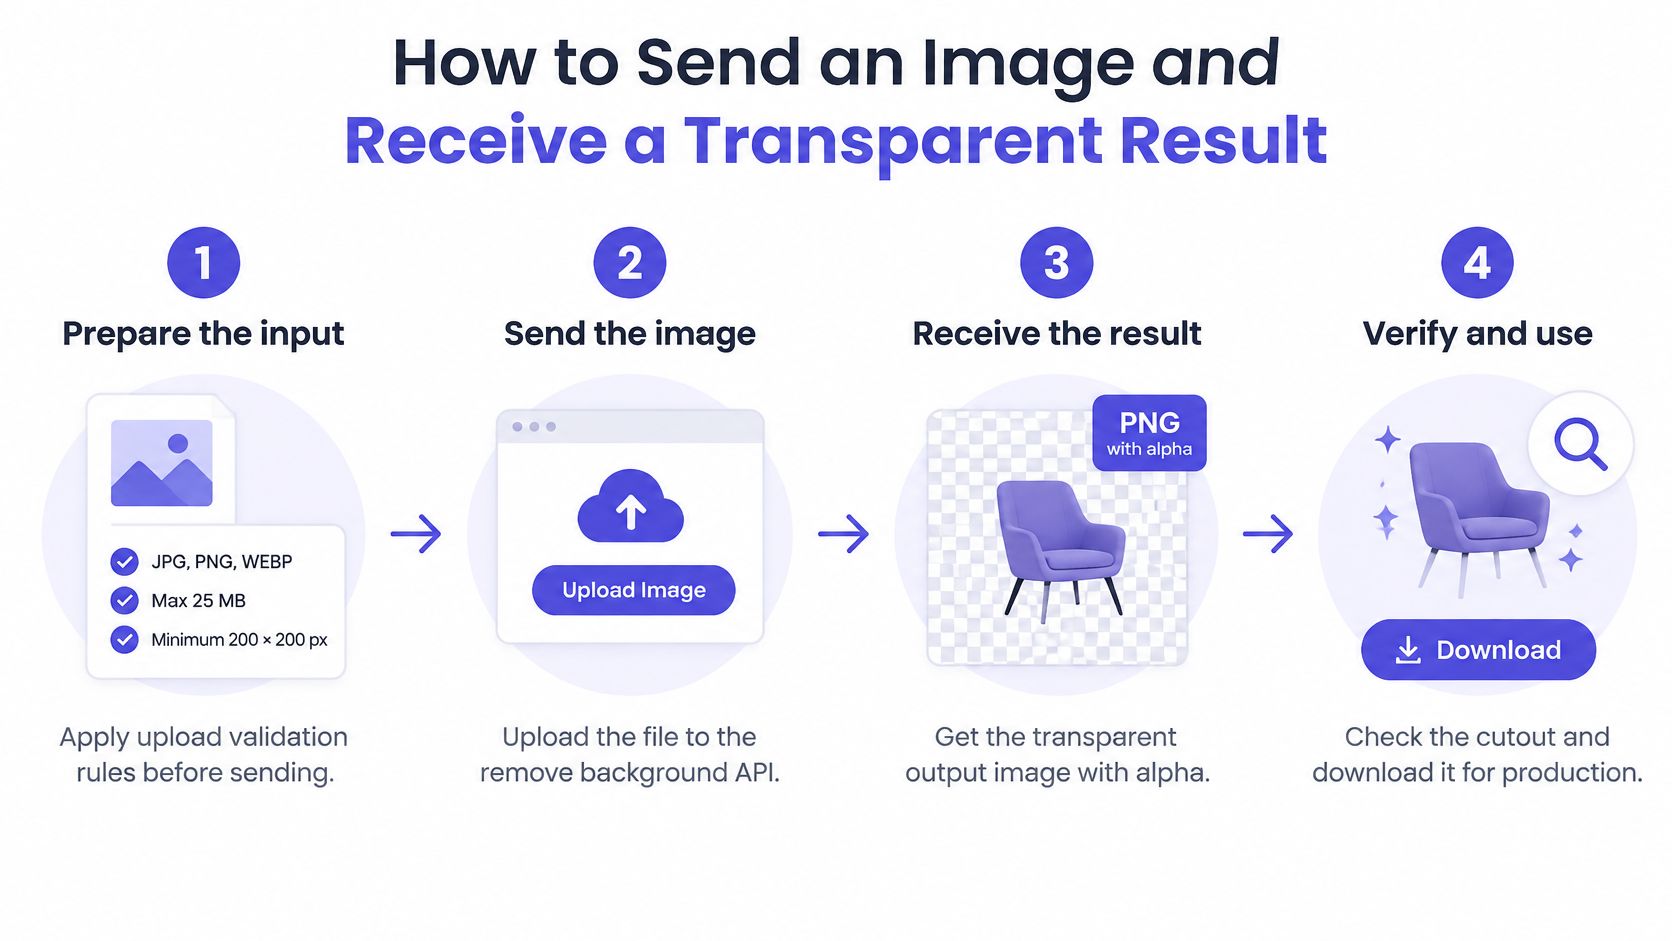
The calling sequence
- Prepare the input. Apply your upload validation rules before sending, so malformed or oversized files fail in your code with a clear error. Don't pay inference costs to discover a file was never an image.
- Authenticate with a scoped key. Use an API key dedicated to this application, not a shared workspace key. If it leaks, you can revoke it without breaking unrelated services.
- Send the image and request the output type. Ask for RGBA PNG when the result will be composited. The common slip is accepting a provider default that flattens onto white.
- Read the response metadata. Confirm output dimensions, color model, and alpha bit depth before storing the file. A silent resize or color conversion breaks dimensions and brand color later.
- Handle a task response correctly. If you receive a task ID instead of an image, poll for completion or wait for the webhook. Don't treat a pending response as a failed image and submit duplicates.
- Verify the alpha channel programmatically. Decode the file and confirm the alpha channel exists, isn't fully opaque, isn't empty, and contains intermediate values along edges. This check catches models that paint a checkerboard into an ordinary RGB image.
- Store the result with a content hash. Keep the original image separately for audit and reprocessing. The hash lets you cache safely and prove which output came from which input.
Our media documentation is the reference point for how media jobs are submitted and returned, but the verification step belongs in your client regardless of provider. Providers can change models while keeping the endpoint stable.
The PNG alpha contract
The W3C PNG specification defines alpha samples on an 8- or 16-bit scale, where zero means fully transparent, the maximum means fully opaque, and intermediate values represent partial coverage that can be composited against a new background. Those intermediate values are the whole point. Hair, translucent material, and anti-aliased edges don't occupy pixels in an all or nothing way.
Check whether RGB values are straight alpha or premultiplied alpha, and record that in your asset metadata. If your compositor assumes one and the file uses the other, edges will darken or lighten even when the mask is accurate. Also remember that the PNG contains the foreground and transparency, not the eventual background. Compositing stays downstream, where it can be repeated cheaply.
This walkthrough shows the expected request and response flow in practice.
A good result stays clean when placed over black, white, and a saturated color. You should see no bright halo, no chopped hair, and no opaque rectangle where glass should let the new background show through. Test at full resolution, not thumbnail size, because thumbnail scaling hides nearly every edge defect you'll care about in production.
Sync, Async and Webhook Patterns Compared
Image cutouts do not come back on the open HTTP connection. On UberLLM, text streams token by token, while an image or video job returns a task you poll, or a webhook that reports the result as ready. Choose polling or a callback from how soon another system must act, and from how many jobs you will have in flight. A single product photo and an overnight supplier feed use the same job model. They should not share the same client design.
Waiting on a task for interactive work
For a prototype or a user-facing preview, submit the image, store the task id, and poll until the transparent PNG is ready. The person waiting still sees one progress state. Underneath, the client is polling a task, so a slow seller does not pin a request thread for the whole generation.
Set a bounded timeout on that wait, and retry status checks with an idempotency key so a retry does not start a second inference. Show a progress state and a failure path. Do not leave an upload screen spinning. Resize only by a documented rule. Downscaling inputs to make the wait look shorter destroys fine edges and makes later quality comparisons invalid. The alpha channel is the asset you are waiting on, not a flattened preview.
Polling for large images and batches
A task-based call returns an identifier first. You poll status until the cutout is ready. That split matters when media sits next to chat: text streams, images and video do not, even under one API key.
Poll with backoff. Make status checks safe to retry. Store the task id before the first poll, because a process restart should not orphan a paid job. Async task tracking and webhook callbacks keep high-volume media workflows moving when individual images finish out of order.
Webhooks for pipelines
Use webhook callbacks when another system should act as soon as a cutout is ready, such as a catalog publisher or template renderer. Authenticate the caller on your own endpoint before you trust the payload, acknowledge quickly, and do the heavy download and storage in your own queue. Your handler must accept duplicate deliveries without publishing the asset twice.
The Photo Editing API guide describes background removal as one operation in a wider editing flow, which is where callbacks earn their complexity. For image and video jobs, task tracking and webhook callbacks mean that an interruption on one seller does not lose the customer's job. You still need reconciliation. On a schedule, list tasks that never produced a callback and poll them directly.
Poll or subscribe for every image job, including a one-off prototype. Move from tight polling to webhooks once images arrive in batches or feed another automated system.
Measuring Mask Quality With an Acceptance Test
Don't approve a provider because twenty sample images looked nice in a browser. Build a repeatable acceptance test with fixed inputs, fixed thresholds, and metrics that separate coarse subject detection from boundary quality.
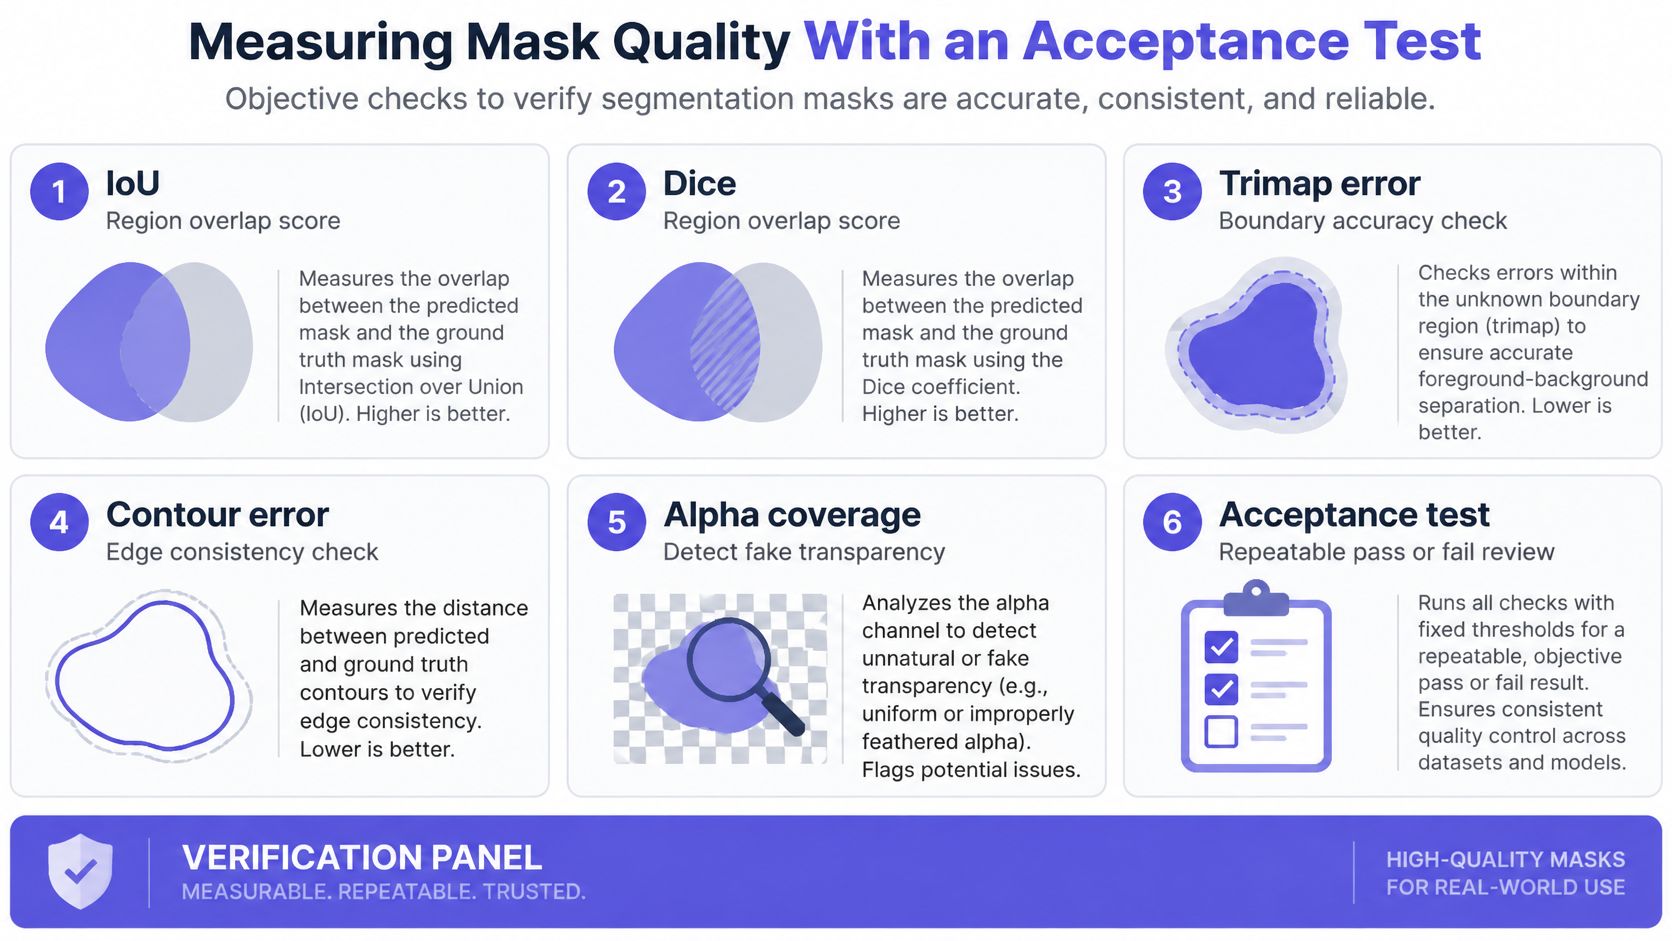
Metrics that support a decision
| Metric | What it measures | Use it to judge |
|---|---|---|
| IoU | Region overlap between predicted and ground-truth masks | Coarse segmentation accuracy |
| Dice | Overlap weighted toward smaller regions | Small subjects and thin parts |
| Trimap or contour error | Accuracy along the boundary | Hair, fur and soft edges |
| Alpha coverage | Share of semi-transparent pixels | Whether real transparency was returned |
| p50 and p95 latency | Typical and tail response times | Batch throughput and user wait |
| Retry success rate | Share of retried calls that complete | Reliability under failure |
IoU and Dice tell you whether the provider found roughly the right region. They don't tell you whether the edge will composite cleanly. A mask can score well on overlap while cutting off every loose hair, because hair occupies few pixels relative to the whole subject.
Trimap or contour error focuses evaluation near the boundary, where customers notice failure. Alpha coverage is your cheap sanity check on every response. If supposedly soft subjects return only fully opaque and fully transparent pixels, you're looking at a thresholded mask, a flattened fake, or an output option you didn't intend to request.
Latency belongs in the same report. Record p50 and p95 latency separately, plus retry success rate, because average response time hides the tail that determines batch completion and user abandonment.
Designing the test set
Create a ground truth set with pixel level masks where possible, and stratify it by fine structures, low contrast, reflective or transparent objects, multiple subjects, shadows, and cluttered backgrounds. NIST segmentation-based measurement guidance distinguishes binary masks in which background is 0 and foreground is 1, a useful reminder that your API should define mask semantics explicitly rather than making clients guess them.
Include varied lighting, camera devices, aspect ratios, and the file formats your users really upload. A studio catalog set won't predict performance on phone photos taken in warehouses. A portrait set won't tell you anything useful about glass bottles or chrome parts.
Set pass thresholds per class before testing. If you choose thresholds after seeing results, you'll rationalize whatever the first provider returns. Ask for a soft alpha matte plus an optional binary mask at a documented threshold, and evaluate each for its intended use.
Show a confidence score to users only after you've calibrated it on held out data. An uncalibrated score creates false assurance and makes human review queues less useful, because reviewers stop trusting the routing signal.
Rerun the identical set after any model or provider change. In a marketplace or routed setup, edge behavior can change even when the endpoint and request format stay compatible.
Hard Cases Where Masks Fail and How to Fix Them
The most common costly failure is a missed foreground object. A hand holding the product disappears, a second person is treated as background, or an accessory is cut away. It's more damaging than a rough edge because downstream compositing can't invent the missing subject, and your acceptance test should fail the whole class when it happens.
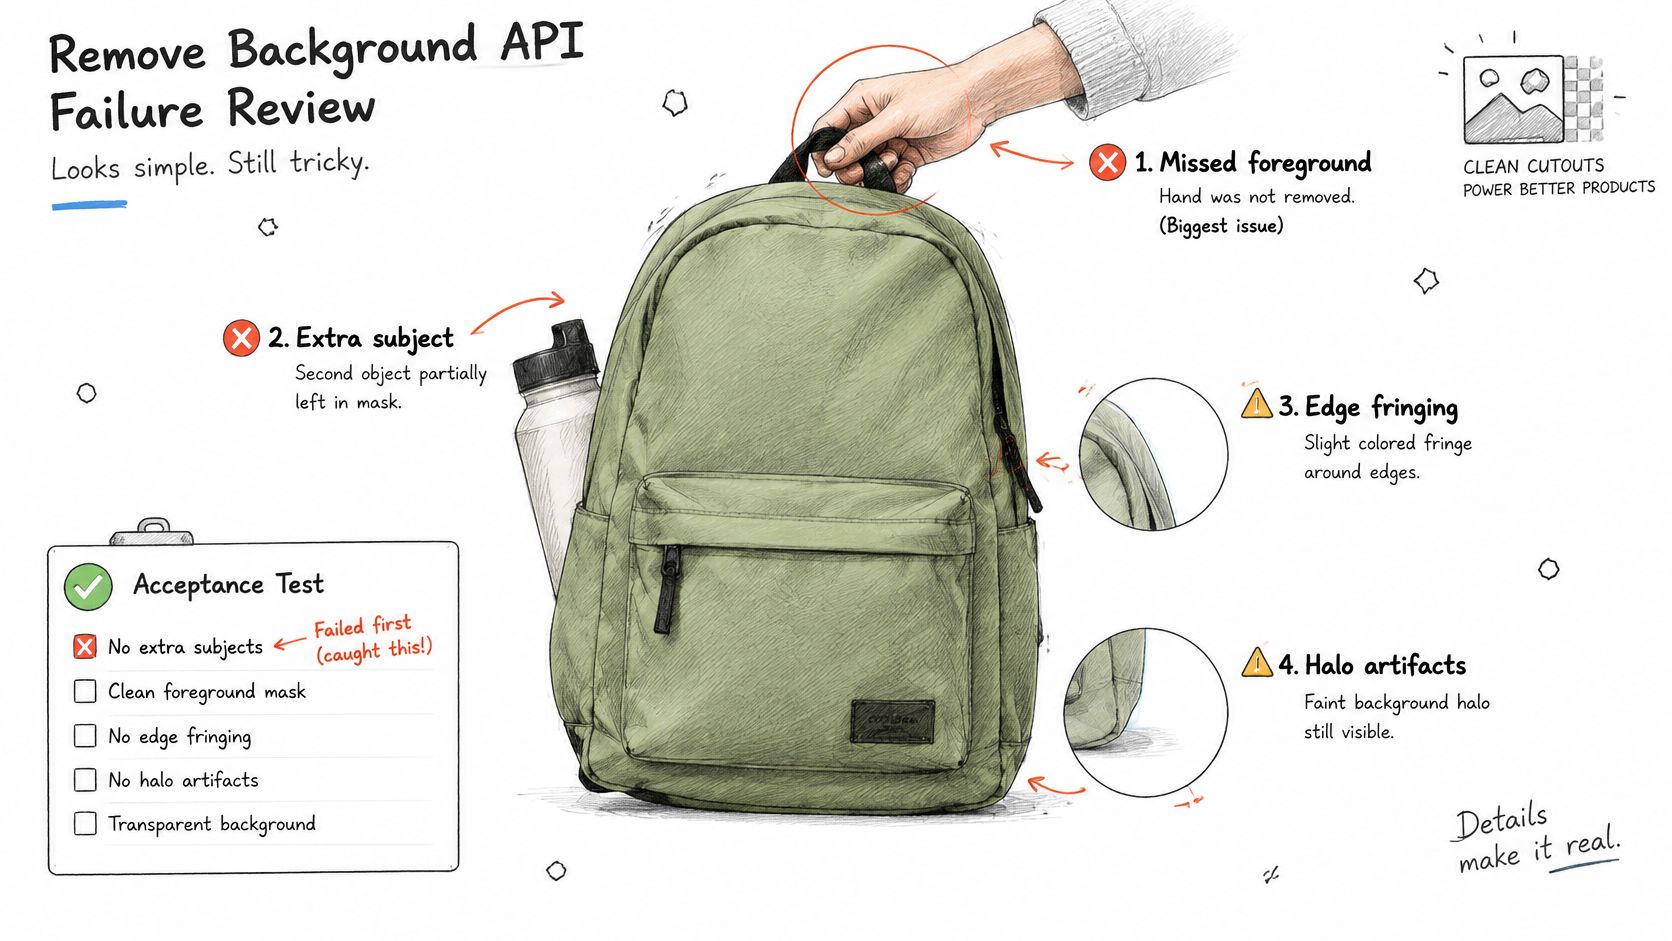
Visible edge failures
- Hair and fur halos: The cutout looks acceptable on white, then shows a bright fringe on a dark background. The likely cause is a binary or hard thresholded mask. Request an alpha matte and check edge pixels for partial values.
- Broken lace, mesh, and thin metal: Straps, wires, jewelry chains, and bicycle spokes break into fragments. The input may lack enough resolution for the structure, or the model may classify thin parts as background texture. Send the higher resolution original and apply a contour check to this class.
- Subject and background color collision: A white dress on white bedding or a black dog on a dark sofa produces wandering edges. The fix isn't to demand perfection from every provider. Route low contrast cases to human review or a stronger model and record them as a separate test class.
Don't hide these defects by shrinking the preview. Composite at full size on a contrasting color and inspect the boundary, since that's how a customer zooming into a product page will encounter it.
Product decisions disguised as model errors
Transparent objects need a product rule. Glass and clear bottles should retain translucency where the background shows through. A matte that turns glass fully opaque creates a waxy product image, while a matte that deletes it entirely is an obvious fail. Decide what counts as correct for bottles, windows, veils, and plastic packaging before scoring them.
Shadows also need an explicit choice. Keep a soft contact shadow as partial alpha if you want a natural composite, or drop it for a clean catalog cutout. Both are valid, but switching between them across a catalog looks inconsistent. Encode the choice in your request profile and test it.
Overlapping people test instance separation. Each person should remain distinct where bodies overlap, without one person's arm being assigned to the background or merged into the neighbor. Whole image overlap metrics can miss this, so inspect this class visually alongside boundary scores.
Fake transparency is the least visible failure and the easiest to catch. Don't look for a checkerboard. Decode the file and test whether an alpha channel exists with meaningful transparent and semi transparent pixels. A checkerboard pattern in RGB is a picture of transparency, not transparency.
Triage order: Check alpha presence first, then edges, then missed subjects. That order eliminates unusable files before you spend time judging subtle quality differences.
Video Frames and Temporal Consistency
Video isn't a folder of unrelated still images. Frame by frame segmentation has no temporal memory, so a boundary can move slightly between nearly identical frames. Played at speed, those small changes become flicker around hair, hands, and product edges.
Throughput is the other constraint. Every per frame API call adds an upload and a network round trip before you can encode the result. A workflow that feels acceptable for one portrait can become unworkable for a short clip, even before you consider retries.
Three architectures
| Architecture | Temporal stability | Throughput | Best for |
|---|---|---|---|
| Per-frame API calls | Low, boundaries can jitter between frames | One round trip per frame | Stills and short clips with few frames |
| Server-side async jobs with propagation | Higher, uses temporal tracking | Queued and batched | Product clips and batch processing |
| Hybrid keyframes with local tracking | Medium, depends on the tracker | Fewest API calls | Live previews and long footage |
Per frame API calls are the simplest prototype and the easiest architecture to debug. They're also the least stable and usually the most request heavy. Use them for stills, thumbnails, or a handful of selected frames, not as an assumption for full footage.
Server side asynchronous jobs with temporal propagation let the processing system use information across frames. You submit the clip or a batch, track the job, and retrieve a more stable sequence of masks. This fits product clips and offline processing where a queue is acceptable.
Hybrid keyframes with local tracking reduce API traffic. You send selected keyframes for high quality segmentation, then track the subject locally between them and request a new keyframe when tracking confidence drops or the scene changes. This is attractive for live previews, but the tracker becomes part of your quality surface and needs its own tests.
Build a capacity checklist before committing. Record requests per second per user, concurrency limits, queue behavior, total data transfer in both directions, retry cost, and how you'll recover a partially processed clip. The cheapest per image price can become the most expensive option when instability forces reprocessing, manual cleanup, or another encode.
Pin the model or provider for a clip, store masks per frame, and log the version used for each job. Without that discipline, rerunning the same footage after a routing change can produce a different result and you'll have no clean way to reproduce the version a customer approved.
Validating Uploads, Keys and Error Handling
Most production incidents around a remove background API aren't exotic model failures. They're bad inputs, leaked keys, duplicate retries, and clients that treat every error as temporary. Put controls in place before inference, not after a queue fills with unusable files.
Validate the actual image
Sniff the actual MIME type and decoded dimensions instead of trusting the filename extension. A file called product.png can contain anything. Decode headers safely, cap total megapixels, and reject malformed or decompression bomb inputs before they reach the model.
Set minimum dimensions as well as maximums. Very small images don't contain enough edge information for a reliable matte, and your application should tell the user that directly. Also decide how you'll handle images that already contain transparency, since flattening or preserving it changes the result.
Keep validation errors specific. Unsupported format, image too large, and image too small need different user actions. Generic failure messages produce repeated uploads of the same bad file.
Scope and protect keys
Use one key per application, keep it on the server, and never ship it in front end code. API keys are scoped and revocable, and requests are encrypted in transit. Review our authentication documentation for how key handling fits your client, then rotate keys on a schedule and immediately after staff or vendor changes.
Set a per key request ceiling where the platform allows it. A ceiling won't prevent a leak, but it limits how much damage a leaked key can do before alerts and revocation catch up. Add an idempotency key to uploads and job submissions, so a network retry doesn't create a second billable duplicate.
Map errors to client behavior
| Status | Meaning | Action |
|---|---|---|
| 429 | Rate limit reached | Wait the indicated time, then retry |
| 503 | Service unavailable | Retry with exponential backoff |
| 4xx validation error | Input rejected | Fix the input; do not retry unchanged |
The distinction is simple. Retry rate limits and temporary unavailability with bounded exponential backoff and jitter. Don't retry a validation error with the same bytes, because you'll get the same rejection more slowly.
Log the input hash, output hash, task ID, and model version for every job. That record supports audits, duplicate detection, and reprocessing without keeping customer images longer than your retention policy requires. Store the original only where reprocessing or dispute handling needs it.
Confirm Your Pick Before You Ship
Ship only after three gates pass on your own images. The output format must match your compositor, the response pattern must fit your image size and volume, and the provider must pass your acceptance test across the hard classes, not just on clean samples.
A checklist you can run today
- Collect a stratified sample of real uploads, including hair, glass, low contrast subjects, multiple people, shadows, and cluttered backgrounds.
- Run the acceptance test with thresholds set in advance and score region overlap separately from boundary quality.
- Confirm real alpha by decoding outputs and checking for transparent and semi transparent pixels.
- Measure p95 latency and retry behavior under the concurrency and image sizes you expect in production.
- Check validation and key controls, including malformed uploads, revocable scoped keys, and idempotent retries.
If you want to test a route through UberLLM, start from the https://api.uberllm.dev/v1 base URL. One API key works with OpenAI- and Anthropic-compatible requests, and a customer can use a free API key and must add credit to go beyond it. That compatibility reduces client changes, but it doesn't guarantee edge quality, so confirm the chosen model returns real alpha on your data.
I'd also rerun the same test after switching models, even when only the model identifier changes. Endpoint compatibility makes migration easy enough that teams sometimes skip the very evaluation that would catch a different matte style.
Ship the provider that passes every gate on your images, not the one with the most attractive preview.
Run your acceptance test through UberLLM to compare background removal routes under one API key and one balance, using the same images and alpha checks you'd use in production. Start with a free key, verify the matte at full resolution, and keep only the model that passes your boundary, latency, and retry gates.