How to Make AI Music Video Synced to a Track
How to make AI music video clips that stay on the beat, from the shot list and short generations to lip sync, rights, and the final cut.
You've finished an original track, but the video is still a folder of promising clips. The singer looks right in the verse and different in the chorus. A camera move feels spectacular on mute, then lands late against the hook. You also need a vertical release clip, not just a widescreen upload.
Learning how to make an AI music video means solving those editorial problems, not finding a prompt that produces an entire film. Start with a timed shot list and a rights folder. Generate pictures you can check independently, then make the musical decisions in an editor.
Table of Contents
- What You Need Before the First Generation
- Turn the Song into a Timed Shot List
- Generate Short Clips and Cut Them to the Track
- Lock Lip Sync and Beat Hits
- Repair Drift Flicker and Late Cuts
- Clear Rights and Say How AI Was Used
- Export the Master and Queue the Next Clip
What You Need Before the First Generation
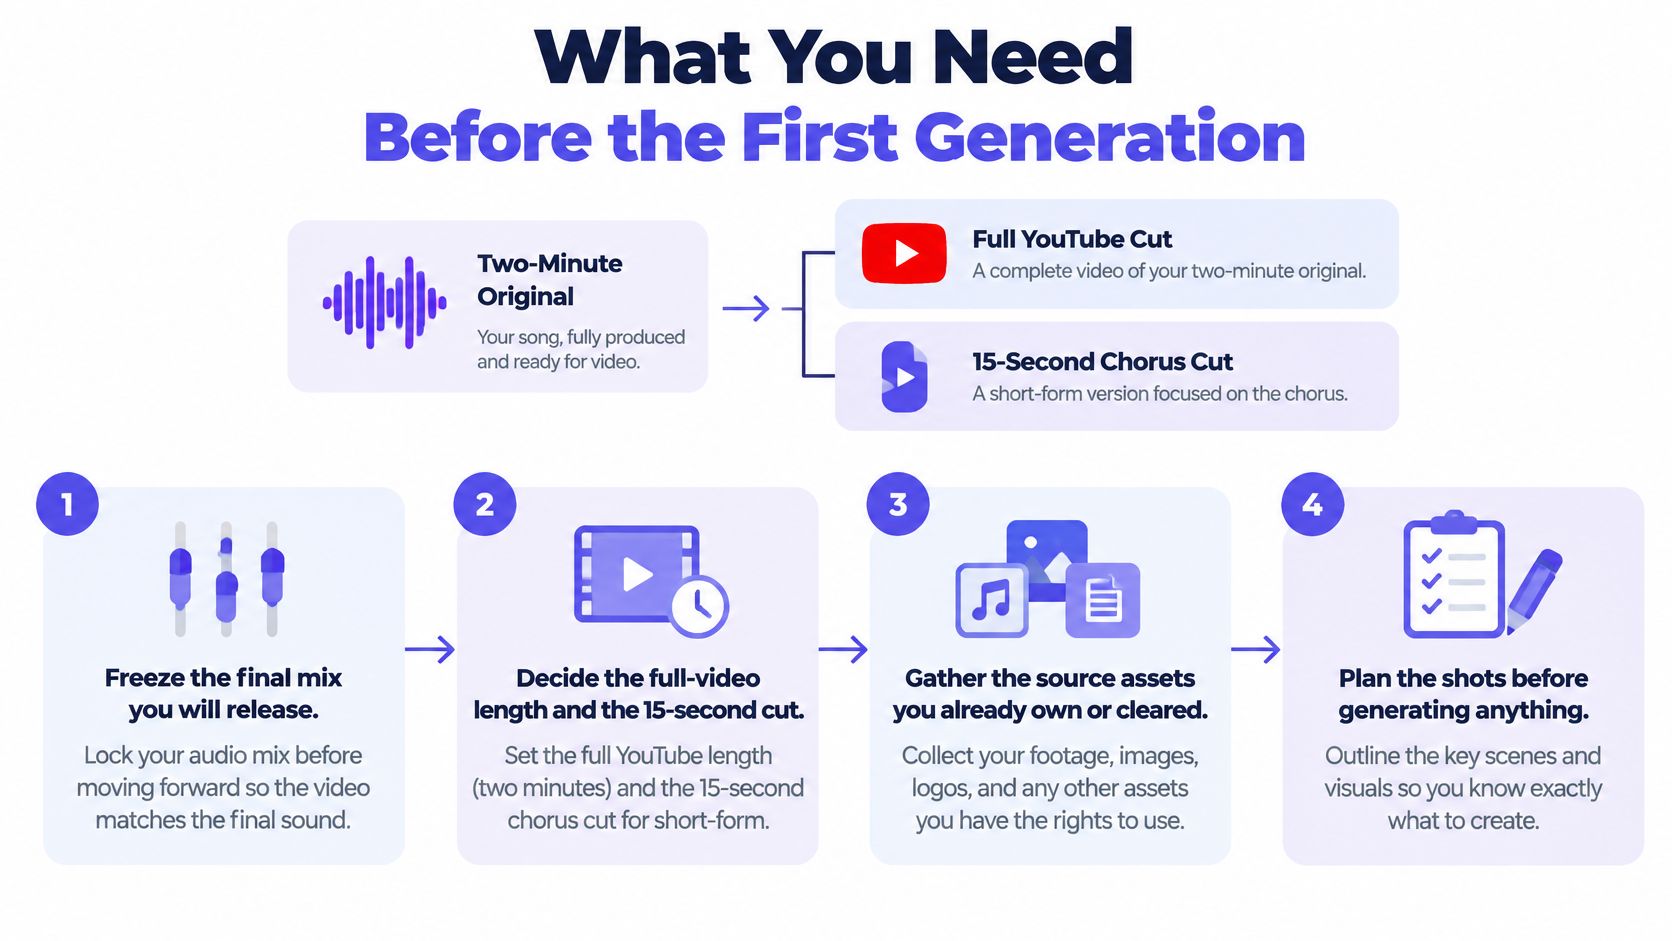
Say your two-minute original needs a full YouTube cut and a 15-second chorus cut. Treat those as connected deliverables, with shared imagery but different framing, rather than asking a generator for one finished film.
Gather the final mix, BPM, lyric sheet, character reference, and cleared source assets. Plan widescreen and vertical crops before approving compositions. A face placed against the edge of a horizontal frame may disappear when you crop for a phone.
Prepare the project before choosing a model
Use this working order:
- Freeze the release mix. Changing the arrangement later can invalidate picture timing.
- Mark the song sections. Identify the intro, verses, chorus, bridge, and outro.
- Write the shot list. Assign a visual job to each musical passage.
- Generate stills or short clips. Keep each shot independently replaceable.
- Reject weak takes. Don't build the edit around footage you already know is broken.
- Assemble in a non-linear editor. Keep musical timing under human control.
- File the production records. Save prompts, reference stills, outputs, and licenses together.
This preparation flow keeps generation downstream of the song and its assets.
Tool type needed at each production stage
The One More Shot production guide describes the generate, animate, and edit pipeline, and notes that Stable Audio 2.0 supported songs up to three minutes in April 2024, while MusicFX generated clips up to 70 seconds in 2024.
| Stage | Tool type | Choose by |
|---|---|---|
| Audio source | Text-to-music model such as MusicLM, MusicGen or Stable Audio | Required track length and usable musical structure |
| Stills and reference frames | Image-generation system such as Stable Diffusion | Same face, wardrobe, and palette across shots |
| Shot generation | Controllable text-to-video or image-to-video model | Motion control and reference conditioning, not full-song promises |
| Early frame pipeline | Deforum-style animation | Technically demanding and time-consuming, so reserve it for experiments |
| Lip sync | Vocal-stem alignment checked with a dedicated lip-sync benchmark | Audio-visual alignment, not general picture quality |
| Editing | Non-linear editor at delivery frame rate | Fine audio offsets and localized retiming |
Before committing, test performance, narrative, abstract, lyric, and animated treatments against the same chorus. Compare revision control, not just the prettiest first result, and use the video API pricing comparison to budget for rejected takes as well as approved footage.
Turn the Song into a Timed Shot List
Build the picture around the track timeline. The following spans are illustrative planning choices, not measured averages or rules about songwriting. Replace them with your actual section markers.
Shot lengths and sync jobs by song section
| Section | Typical span | Shot length | Visual job | Sync priority |
|---|---|---|---|---|
| Intro | Example: 4–8 seconds | One shot of 4–8 seconds | Establish place, character, or motif | First downbeat |
| Verse | Example: 15–30 seconds | Two to four shots of 4–8 seconds, adjusted to cover the passage | Coverage, lyric detail, restrained motion | Phrase changes |
| Chorus | Example: 15–25 seconds | Three to five shots of 3–6 seconds | Repeat a hero frame with a stronger move | Beat hits and hook lyric |
| Bridge | Example: 8–16 seconds | Two to three shots of 4–8 seconds | New color, location, or angle | Section change |
| Outro | Example: 6–12 seconds | One to two shots of 4–8 seconds | Return to the opening frame and release | Final hit, then hold |
Start by filling a chorus row. In a hypothetical shot from 00:42 to 00:47, the same singer stands beneath a red overhead light while the camera pushes toward her face. The hook begins at the shot's entrance, and the next cut lands on the marked snare.
That row needs more than a visual description. Record the shot ID, start and end time, reference filename, subject, action, camera move, lighting, and transition into the next shot. Add a separate field for the exact lyric or musical event that must coincide with the picture.
Translate musical structure into coverage
Export the BPM, beat grid, section markers, and lyric or phoneme timestamps where vocals matter. Check automated markers by listening: a pickup syllable may begin before the downbeat, and the strongest visual cut may belong at the phrase change rather than on every kick.
Use the intro to establish geography. Give verses complementary coverage, such as a medium performance frame, an environmental detail, and a restrained close-up. Repeat a recognizable hero composition in the chorus, but increase the movement or lighting intensity so the return feels intentional.
For the bridge, change something viewers can read immediately: location, dominant color, or viewing angle. Returning to the opening composition in the outro can close the visual idea without introducing another setting.
Practical rule: Every shot should have a musical reason to start and a visual reason to end.
Keep approved reference stills attached to their shot IDs. The video-generation evaluation survey identifies spatial inconsistency, temporal inconsistency, flicker, weak prompt alignment, and unstable transitions as distinct problems, which is why you should inspect more than overall beauty.
Leave trim handles around the intended action so the editor can move a cut without losing the performance. For an illustrative chorus test, short replacement takes also make spending easier to contain: New Market Pitch lists published AI video-generation prices of approximately $0.05 to $0.40 per second in 2026.
The list is ready when every moment of the song has an owner shot, every essential beat has a marked visual event, and no prompt asks the subject to perform competing actions.
Generate Short Clips and Cut Them to the Track
A reliable production pass separates asset approval, generation, and editing. Don't alternate randomly between polishing a frame, changing the story, and replacing the song. That makes it difficult to tell which decision caused the latest mismatch.
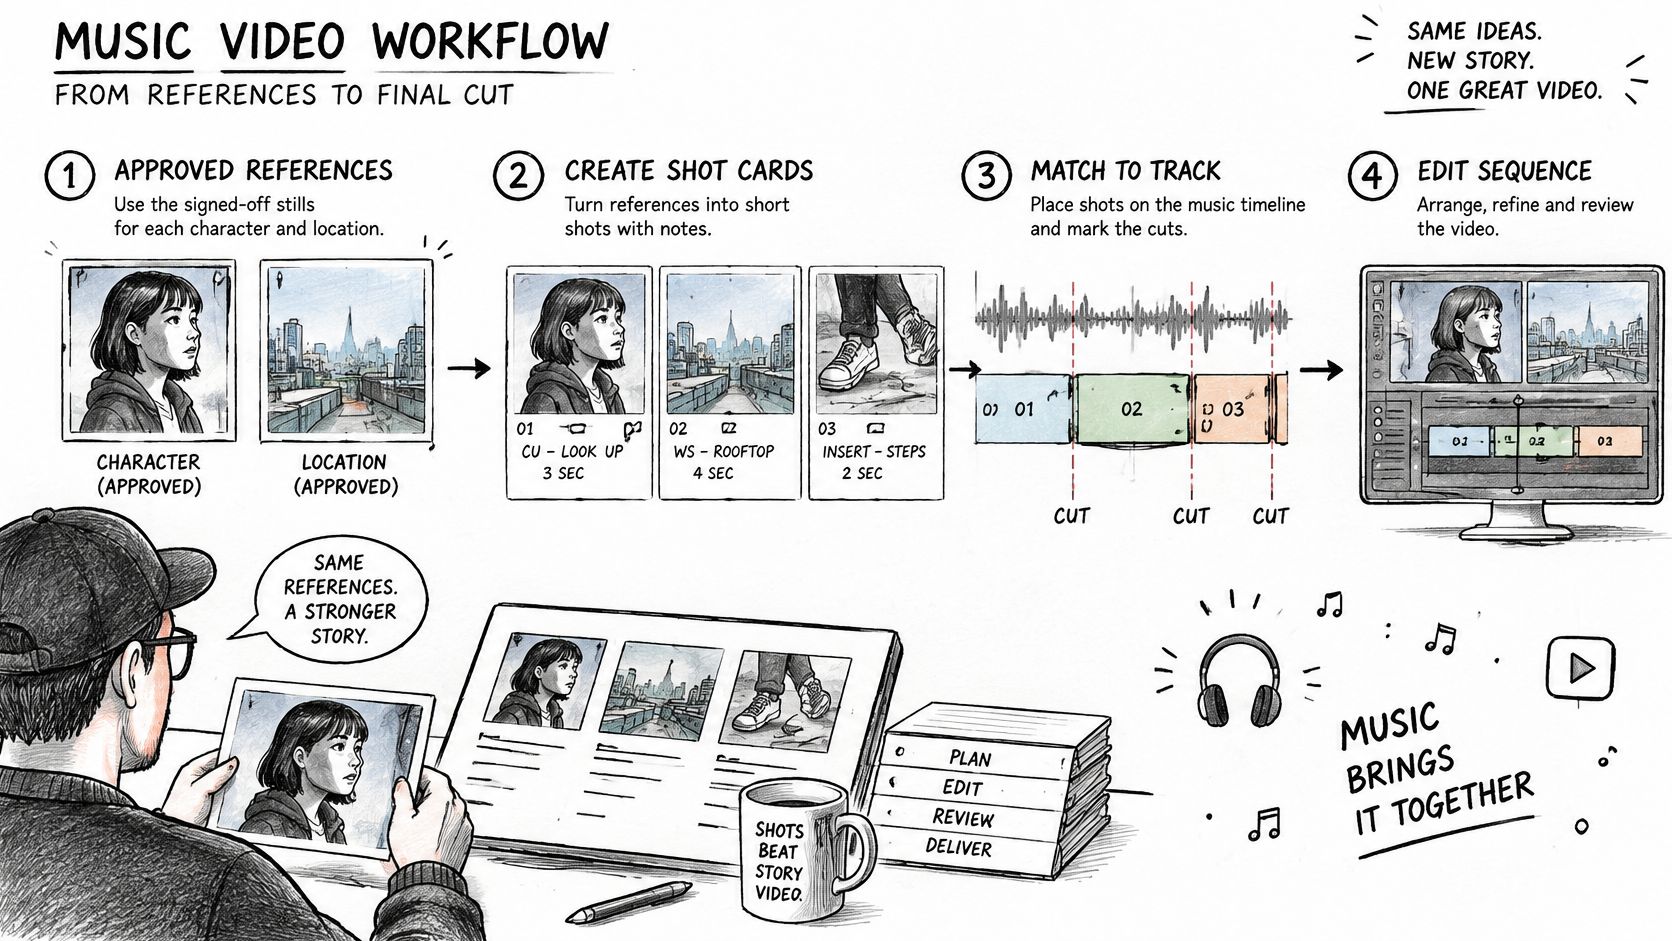
The workflow below keeps each approved output connected to the shot it was meant to solve.
Generate footage that can survive a cut
Approve the reference images. Make a clean character still and a usable location reference before animating either. Check the face, clothing, hands, and background geometry at full size, because image-to-video generation can carry an existing defect into the moving shot.
Write a prompt for each shot. Use subject, action, camera, light, and style, with a single main action. For example: a singer in a dark coat raises her gaze beneath a red overhead light, with a slow camera push and restrained realistic motion. Keep the wardrobe description fixed rather than rewriting it creatively in every prompt.
Generate a short, controllable take. Choose text-to-video for shots where exact identity matters less, and image-to-video when a particular face or composition must persist. Use the delivery frame rate where supported; otherwise, conform deliberately in the editor rather than accepting an accidental timeline setting. The text-to-video prompting guide is useful when translating shot-list language into model instructions.
Review without sound, then with sound. The silent pass exposes warped limbs, flickering surfaces, and inconsistent identity without the song distracting you. The audio pass answers a different question: does the useful action happen where the edit needs it? A technically clean take can still be musically unusable.
Keep only approved takes. Save the prompt, input reference, output file, and a brief acceptance note under the shot ID. Preserve a strong frame from the approved output when it will help condition a neighboring shot. Don't leave rejected and approved versions indistinguishable in the same folder.
Build the edit before adding decoration
Place the final mix on the primary audio track. Lock it against accidental movement, then place winning clips at their shot-list positions in DaVinci Resolve, Premiere Pro, or Kdenlive. Disable generated clip audio unless you intentionally need it. An unnoticed synthetic sound can obscure the released mix or create an unwanted accent.
Trim to the musical event. Start with straight cuts. Add a brief dissolve for a deliberate soft transition, or a whip transition only when the adjoining movement supports it. A transition effect won't repair incompatible camera directions, and a dissolve can make a changing face more obvious by showing both versions together.
Adjust the local timing. If the action lands late, slip the clip's source position, move its entrance, or retime the useful passage. Check neighboring cuts after each change. Don't stretch the entire picture to conceal a problem confined to one take.
Export an undecorated review cut. Watch the complete song before adding grain, lyric cards, glow, or elaborate grading. Review the chorus first when deciding what to regenerate, because it contains the central visual promise and supplies the most useful promotional excerpt. Then check the quieter passages for repetition and pacing.
A clip earns its place by working between its neighbors, not by looking impressive in isolation.
Keep your acceptance decision blunt. If a shot changes identity, relocates a prop without explanation, or breaks the movement across a cut, replace that shot rather than protecting it because its lighting is beautiful.
Lock Lip Sync and Beat Hits
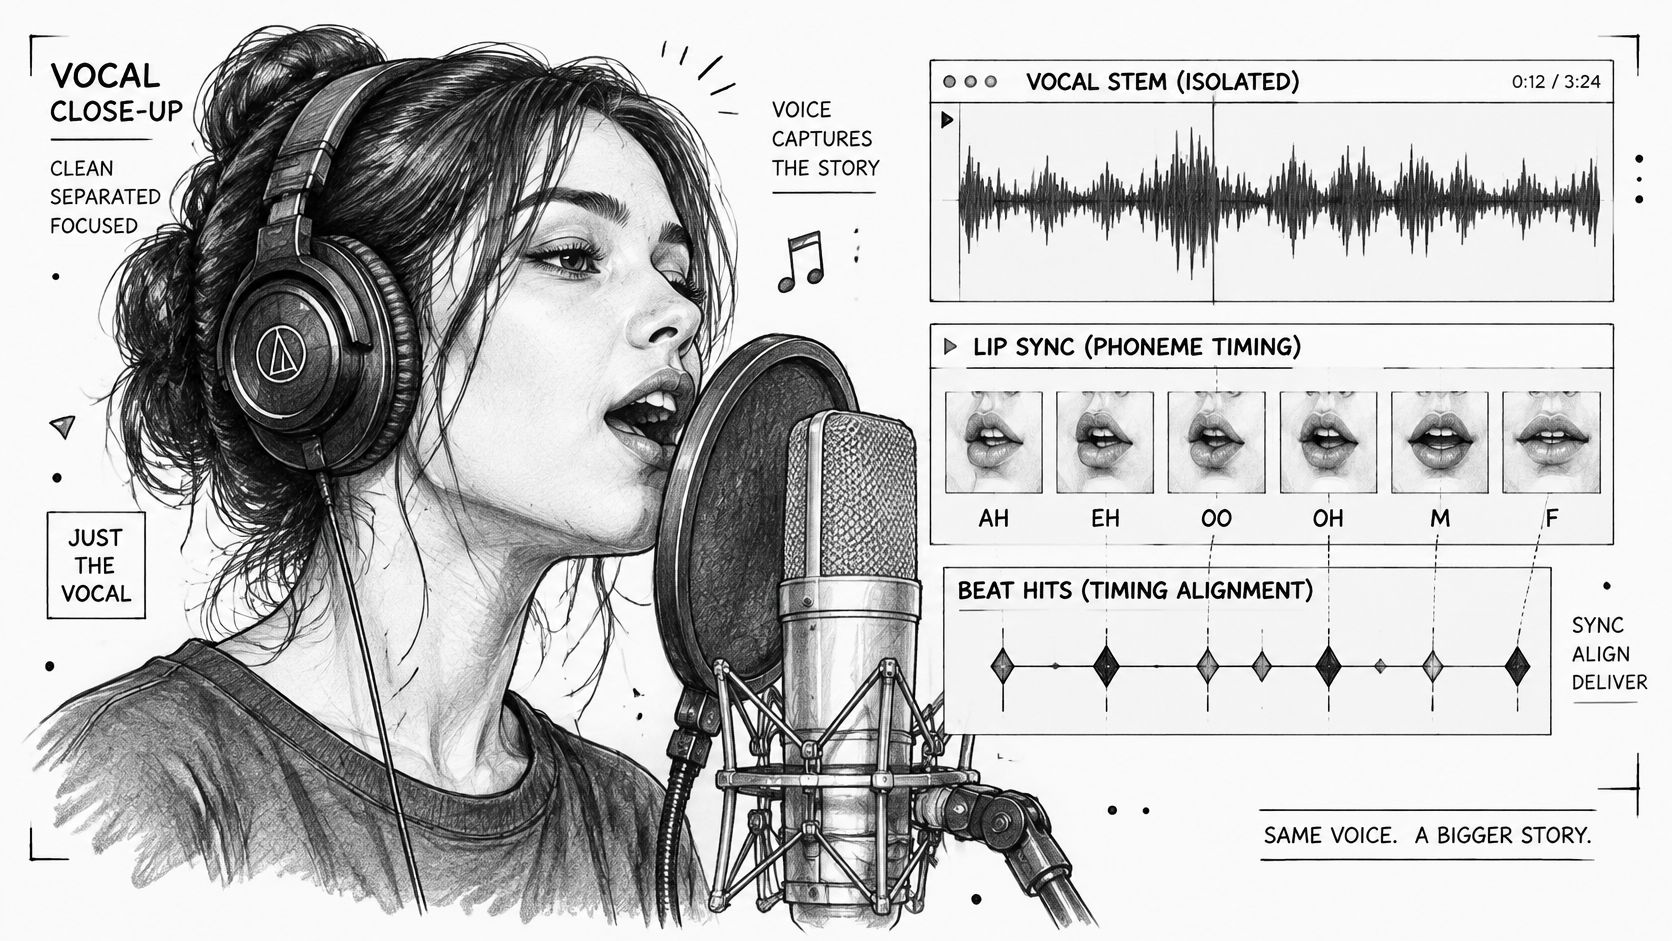
Generate singing close-ups against the final vocal. A scratch vocal with different phrasing isn't an adequate substitute, even when the lyrics are identical. Extract a vocal stem, estimate phoneme or viseme timing, and provide a visible face reference.
Keep the vocal performance and its timing reference together during preparation.
Check articulation separately from motion
For singing shots, inspect consonant-heavy words, rapid syllables, and close-ups. Mouth opening alone isn't enough: the lips and jaw must articulate the sound at the right moment. Correct residual lag locally with fine audio offsets or clip retiming, while preserving the alignment of the release mix.
For shots without a visible mouth, synchronize readable events instead. A head turn, lighting change, or camera arrival can land on a kick, snare, or phrase boundary. Don't force every background movement onto the beat.
The PVSync benchmark paper reports Spearman correlation of 0.83 with human audio-visual quality rankings, compared with 0.34 for LSE-C. These are benchmark results, not a guarantee that a generated performance will pass inspection. Use automated alignment checks to flag suspect takes, then judge the actual articulation yourself.
Use a playback reference alongside your own timeline inspection.
Listen before deciding what looks late
Loop the chorus with eyes closed and mark the accents you expect to see. Watch again against those markers, then inspect suspect words frame by frame.
A polished face with delayed lips is still a reject. Send only approved performance clips back into the edit, and keep intentional anticipation distinct from accidental lag.
Repair Drift Flicker and Late Cuts
The face matches in the verse but changes in the chorus. Stop at the first wrong frame, locate the last approved reference, and regenerate the affected shot from that image. Rewriting the entire sequence usually creates more continuity work than it removes.
Treat the table as a diagnostic starting point, not proof that every symptom has only one cause. First decide whether the defect belongs to the generated footage or to your edit.
Shot failures and the fix that stays on beat
| What you see | Likely cause | Fix |
|---|---|---|
| Face, hair, or clothes change between shots | New prompt or no shared reference | Regenerate from the last approved still |
| Flicker, boiling texture, or warped limbs | Clip too long or motion too complex | Shorten the take and use one action |
| Object jumps or disappears | No continuity note in the next prompt | Name the prop and condition on the previous frame |
| Cut feels late or early | Edit landed off the transient | Slip the cut to the beat; don't stretch the film |
| Scene ignores the prompt | Too many style words, no clear verb | Rewrite with subject and one action first |
Repair the smallest responsible unit
For identity drift, lock the visible attributes that define the person: hair, apparent age, wardrobe, and distinguishing features. Use a reference whose face is readable. A distant silhouette won't provide the same identity anchor as a clear portrait.
For flicker, shorten the requested action and simplify camera movement. In a hypothetical repair, replace a long walking-and-turning shot with a brief stationary head turn. If only the tail becomes unstable, trimming may save the usable portion without another generation.
A jumping prop needs explicit continuity. If the singer holds a microphone in the preceding shot, include that microphone and its position in the neighboring prompt. Check the reference image too, because a prompt can't reliably preserve an object that the conditioning frame contradicts.
Repair boundary: Fix editorial timing in the editor. Regenerate when the pixels themselves are wrong.
An off-beat cut rarely justifies new footage. Move the edit to the intended transient and use the available handles to preserve the action. If there isn't enough usable material, substitute a cutaway rather than slowing the entire sequence.
Reduce scope before increasing effort
A prompt combining walking, turning, singing, and a costume change contains several opportunities for failure. Separate the performance from the transformation, or remove the transformation entirely. When the scene ignores the requested action, put the subject and verb first and strip away decorative style language.
Budget repairs by dependency. An isolated bad take needs another generation attempt; an unreferenced protagonist may require a new approved still and rebuilt chorus coverage. Don't promise yourself that either repair will succeed on the next try.
Keep a rejection log with the shot ID, visible defect, and replacement decision. Hold grading, captions, and final export until every rejected shot has either a passing replacement or an intentional editorial alternative.
Clear Rights and Say How AI Was Used
A convincing picture isn't the same as a releasable video. A generated image doesn't clear the composition, master recording, samples, performers, stock footage, voice, or likeness. A tool's commercial-use permission also doesn't authorize a third-party song you uploaded into it.
The Renderforest music-rights guide explains these separate clearance obligations and the U.S. distinction between purely AI-generated material, which generally lacks copyright protection, and sufficiently original human selection, arrangement, or editing that may qualify.
Build a release-ready rights folder
Keep the documentation with the project, not scattered across inboxes:
- Song ownership: Split sheets and authorization for the composition and master.
- Contributors: Producer agreements, performer releases, and relevant session-player permissions.
- Third-party assets: Sample clearances, stock licenses, and source filenames.
- Faces and voices: Consent covering the intended synthetic use of a real person's identity.
- Generation records: Tool terms, prompt logs, reference origins, and saved outputs.
- Human contribution: Edit decision lists, project versions, and notes documenting creative choices.
Use this checklist before scheduling the upload.

Disclose the process accurately
Industry coverage from AI Music Video Generators cites a survey in which 62% of 5,089 U.S. respondents were less likely to engage with music generated wholly or partly by AI, or wouldn't engage at all; it also cites a separate survey of 1,241 global music makers, where 87% used AI somewhere in their workflow but only 29% used song generators.
Those groups answer different questions. Don't treat their responses as a prediction of your audience's reaction. The useful distinction is between assistance and delegated authorship, so describe what happened rather than calling everything either handmade or AI-generated.
Keep a person responsible for the concept, lyric-to-shot decisions, rejected takes, timing, and final cut. Don't imitate a recognizable artist's face or voice without authorization, and complete applicable platform disclosure fields instead of relying only on the description.
If it accurately describes your production, adapt this disclosure:
AI generated the visual clips; the concept, shot selection, synchronization, and final edit were directed and completed by a human editor.
Export the Master and Queue the Next Clip
Export a full-length master at the timeline frame rate, a vertical chorus excerpt, and a square version only if the composition survives that crop. For the hypothetical release described earlier, the short-form deliverable would be the selected chorus passage, not an arbitrary slice from the master.
Package files for release and revision
Keep these items alongside the exports:
- Editable project: The timeline, linked media, fonts, and effects needed to reopen the cut.
- Production records: The final shot list and approved reference stills.
- Clearance archive: The rights folder and the disclosure used at upload.
- Review notes: Any platform-specific crop or caption adjustments.
Watch the master on a phone speaker and on headphones. Check the beginning, ending, vocal articulation, and every transition after export, not just inside the editor. A correct timeline doesn't excuse an export with the wrong range or displaced audio.
Run one controlled model test
For the next generation batch, test the same approved chorus still and prompt rather than inventing a fresh demo scene. We recommend Kling 3.0 Standard as the first video model to start with, using text-to-video or image-to-video. Judge whether it preserves the subject and produces movement you can revise.
A video takes from about 30 seconds to several minutes to make. Download completed assets promptly: result files are kept for about three hours after a video or music job finishes, while image links are kept for about 15 minutes. The n8n video workflow guide can help organize queued generation and retrieval.
Prioritize rejected chorus takes before optional verse coverage. Publish the cut whose shots each have a time, an approved reference where needed, and a license note. Spend the next generation cycle on a specific unresolved shot, not another collection of attractive footage with nowhere to go.
UberLLM offers API access to image, video, and music models through a shared account balance, so you can connect reference creation and shot generation in one production workflow. Visit UberLLM to test an approved chorus still, retrieve the resulting clip, and bring it into your editor for a beat-by-beat acceptance check.